Connect to Microsoft 365 Exchange Online
Prerequisites
The Azure Active Directory must be connected before connecting Exchange Online.
Integrating IAM.cloud as enterprise application
Before connecting IAM.cloud to Exchange Online, IAM.cloud has to be configured as an enterprise application in Azure Active Directory. That for, log into the Microsoft Azure Admin Portal: Azure Admin Portal
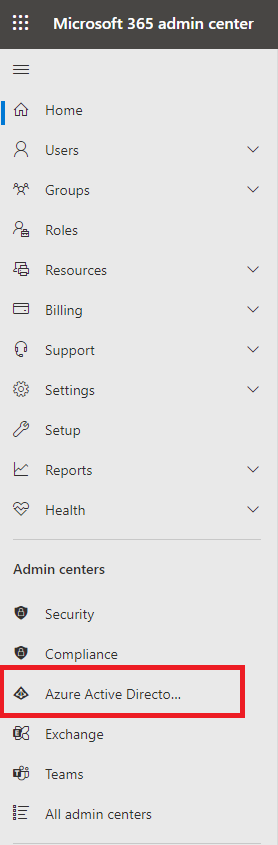
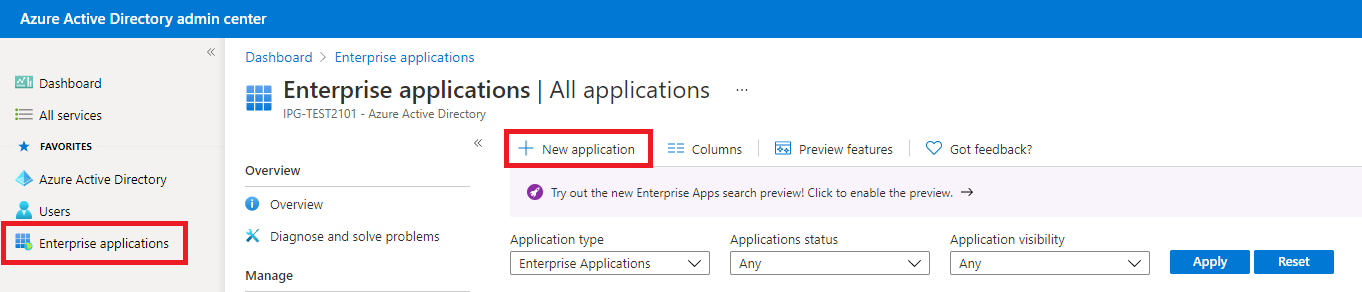
Switch to the Azure Active Directory admin center.
In the Microsoft Azure Active Directory admin center, create a new enterprise application for your directory.

Click “Create your own application”

While naming the enterprise application, select the option “Register an application to integrate with Azure AD (App you’re developing)”. Then click “Create”.
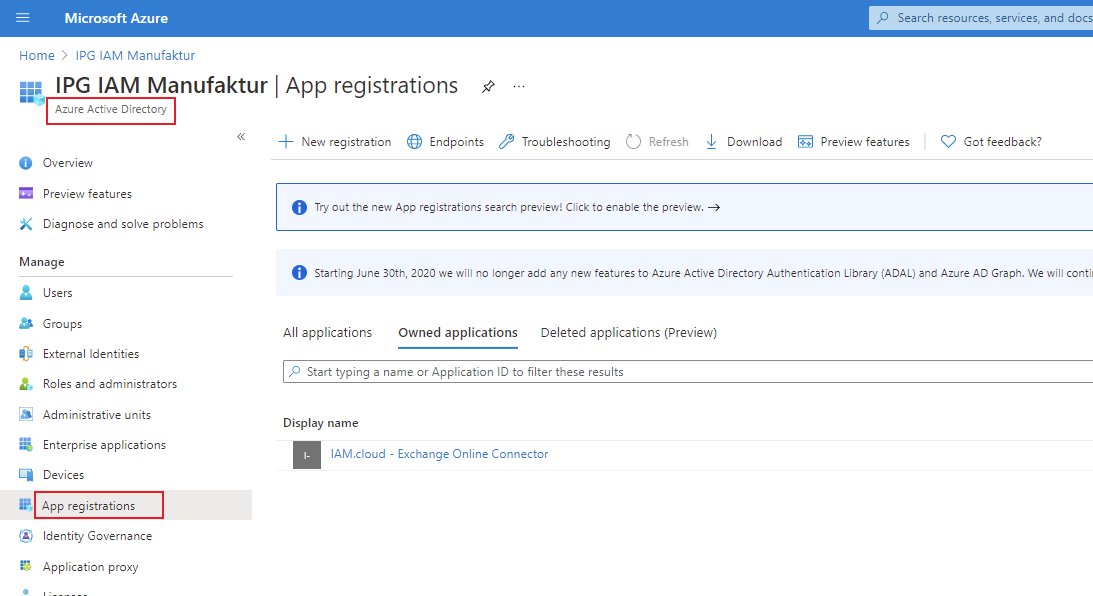
IPG recommends to limit the access to the API to “Accounts in this organizational directory only” (Single tenant). Then click “Register”. Then switch to the Azure Active Directory dashboard and click “App registrations”.
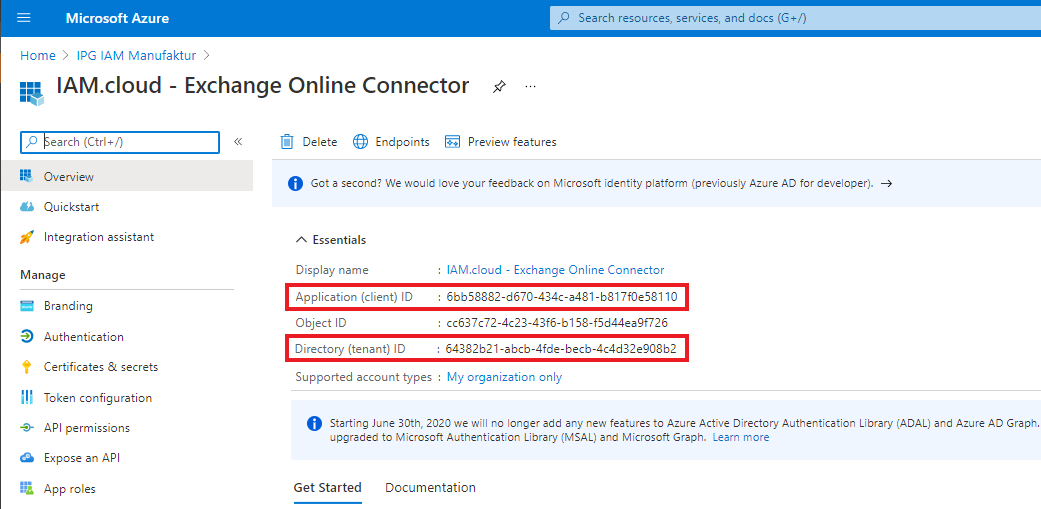
Hint: While setting up the application, an application ID (client ID) is created and a tenant ID (tenant ID) is shown. This application ID and the tenant ID are required for setting up the target system connector.
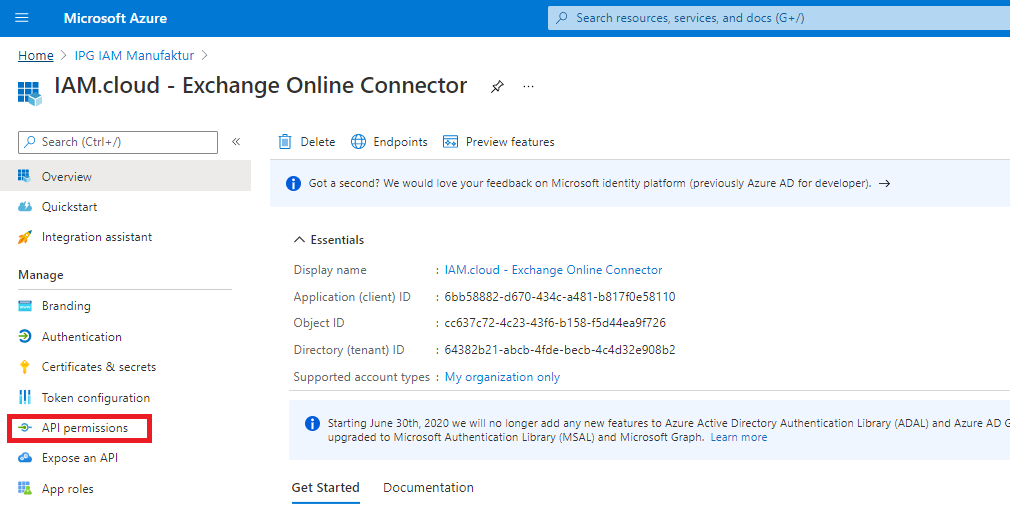
Select the newly created application from the list of applications and click “API permissions”.
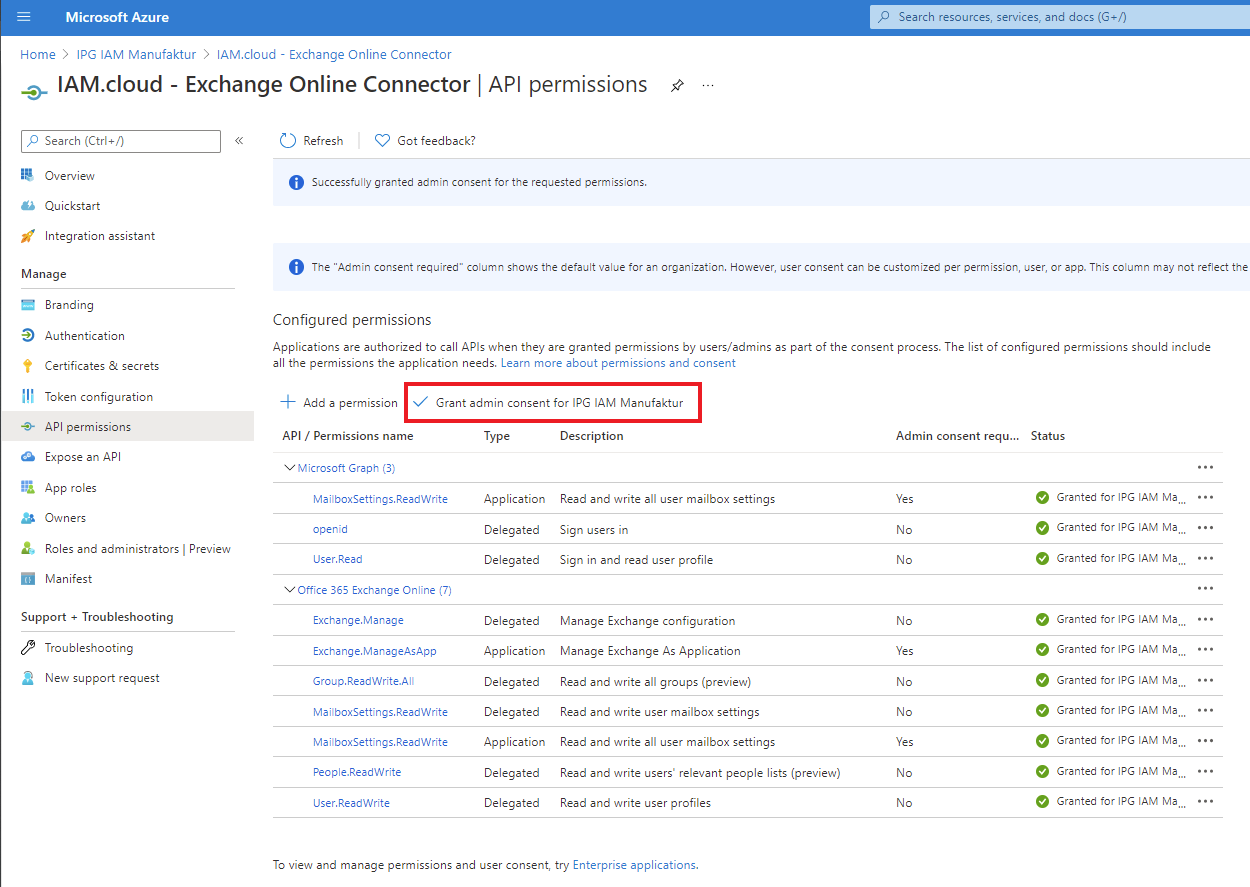
By clicking “Add a permission”, add the following permissions to the application by selecting “Microsoft Graph” as the API and “Delegated permissions” as the type of permissions:
API | Permission type | Permission |
|---|---|---|
Microsoft Graph | Delegated |
|
Microsoft Graph | Application |
|
Office 365 Exchange Online | Delegated |
|
Office 365 Exchange Online | Application |
|
Some of these permissions require administrative consent - this needs to be granted.
Configure the client secret using the option “Certificates & secrets” and clicking the button “upload certificate”.

Hint: The export of the certificate in format PKCS #12 with powershell with the following command (Password and Cert Path needs to be adopted) as password protected certificate archive.
C:\>Get-ChildItem -Path cert:\localMachine\my\5F98EBBFE735CDDAE00E33E0FD69050EF9220254 | Export-PfxCertificate -FilePath C:\mypfx.pfx -Password $mypwdHow to issue a self signed certificate for testing purpose is described in the following article. The relevant powershell examples are shown below.
App-only authentication | Microsoft Docs
# Create certificate $mycert = New-SelfSignedCertificate -DnsName "contoso.org" -CertStoreLocation "cert:\CurrentUser\My" -NotAfter (Get-Date).AddYears(1) -KeySpec KeyExchange # Export certificate to .pfx file $mycert | Export-PfxCertificate -FilePath mycert.pfx -Password $(ConvertTo-SecureString -String "P@ssw0Rd1234" -AsPlainText -Force) # Export certificate to .cer file
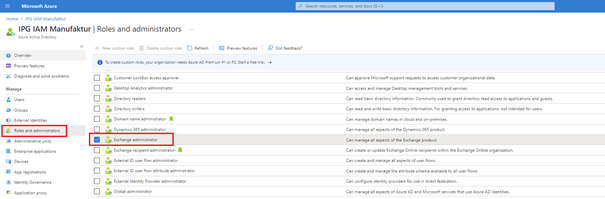
$mycert | Export-Certificate -FilePath mycert.cerAfter creating the Enterprise Application, the app needs to be assigned to the exchange adminstration role.

Setting up the target system connector
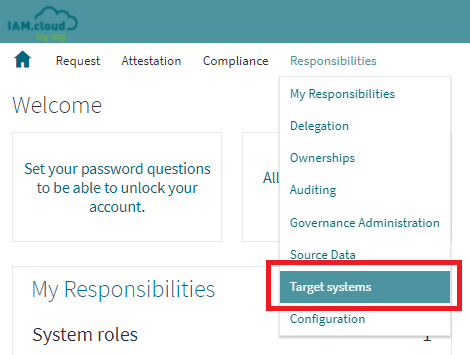
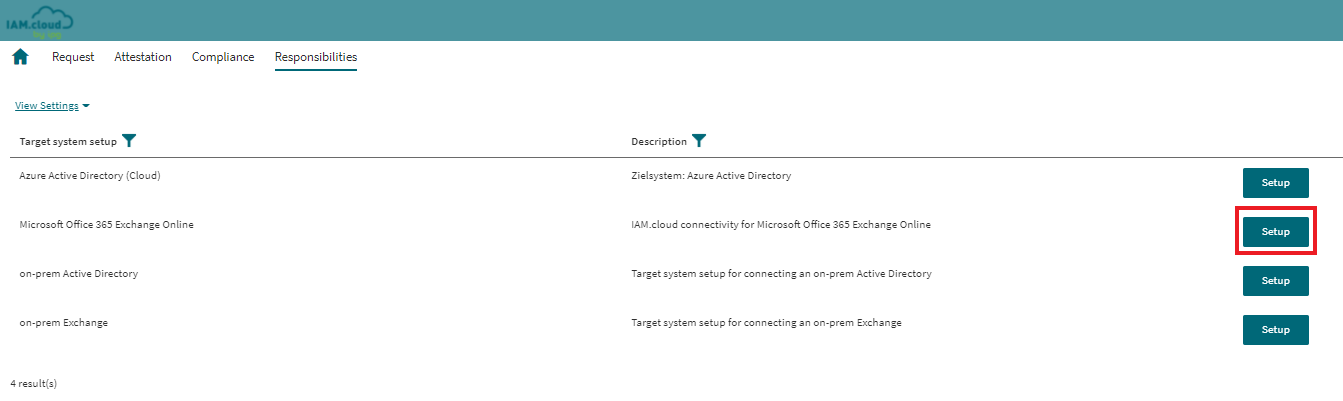
To connect to Microsoft 365 Exchange Online connect to the IAM.cloud portal with a user having the IAM.cloud application role “Global Target system configurator”. Click “Responsibilities” and “Target systems”.
In the list of available target system connectors select the connector “Microsoft Office 365 Exchange Online“ and click the button “Setup” to create a new target system instance.

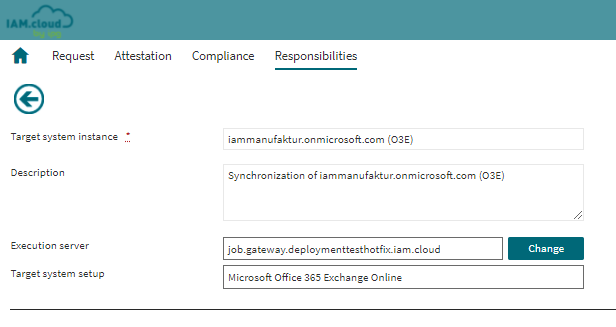
Name the target system instance, put in a description. The IAM.cloud Gateway as the execution server is pre selected.
Attribute | Description |
|---|---|
Target system instance | The name of the target system instance - this is a freetext value with no technical relevance and will be used as the display name for the target system instance only. |
Description | The description to the target system instance - this is a freetext value with no technical relevance and will be used for documentation purposes only. |
Execution server | The server that will be executing the target system connectivity tasks. This has to be a specific IAM.cloud cloud Gateway in order to connect to Exchange Online. The relevant one is pre selected. |
After entering the target system instance attributes, click “Save” to enable the technical configuration of the target system connector.
Fill in the technical attributes for the target system connector and click “Save”.
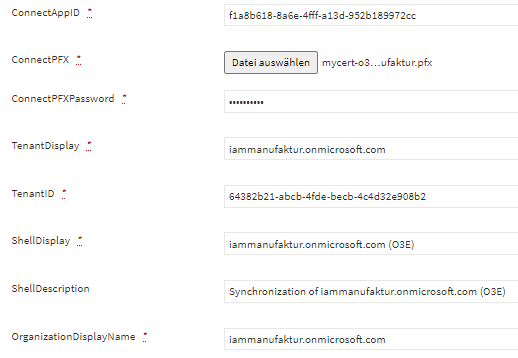
Attribute | Description |
|---|---|
ShellDisplay | The value in the attribute ShellDisplay will be used as the name of the technical connectivity setup. |
ShellDescription | The value in the attribute ShellDescription will be used for documentation purposes for the technical connectivity setup. |
ConnectAppID | Client-ID / Application ID of the created enterprise application |
ConnectPFX | A PFX file of the Certificate assigned to Application, also known as PKCS #12. It is a single, password protected certificate archive that contains the entire certificate chain plus the matching private key. Essentially it is everything that any server will need to import a certificate and private key from a single file. |
ConnectPFXPassword | Password for the single password protected certificate archive |
TenantDisplay | Azure Active Directory org domain name
|
TenantID | The ID of the Azure tenant
|
OrganizationDisplayName | Azure Active Directory org domain name  |
If all mandatory attribute values are filled in and the configuration is saved, the button “Rollout” will be enabled. Click “Rollout” to connect Microsoft 365 Exchange Online to IAM.cloud.
Related articles
-
Page:
-
Page:
-
Page:
-
Page:
-
Page:
Prerequisites
The Azure Active Directory must be connected before connecting Exchange Online.
Integrating IAM.cloud as enterprise application
Before connecting IAM.cloud to Exchange Online, IAM.cloud has to be configured as an enterprise application in Azure Active Directory. That for, log into the Microsoft Azure Admin Portal: Azure Admin Portal
Switch to the Azure Active Directory admin center.

In the Microsoft Azure Active Directory admin center, create a new enterprise application for your directory.
Click “Create your own application”
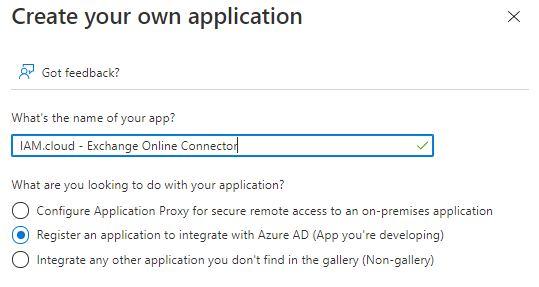
While naming the enterprise application, select the option “Register an application to integrate with Azure AD (App you’re developing)”. Then click “Create”.
IPG recommends to limit the access to the API to “Accounts in this organizational directory only” (Single tenant). Then click “Register”. Then switch to the Azure Active Directory dashboard and click “App registrations”.

Hint: While setting up the application, an application ID (client ID) is created and a tenant ID (tenant ID) is shown. This application ID and the tenant ID are required for setting up the target system connector.

Select the newly created application from the list of applications and click “API permissions”.

By clicking “Add a permission”, add the following permissions to the application by selecting “Microsoft Graph” as the API and “Delegated permissions” as the type of permissions:
API | Permission type | Permission |
|---|---|---|
Microsoft Graph | Delegated |
|
Microsoft Graph | Application |
|
Office 365 Exchange Online | Delegated |
|
Office 365 Exchange Online | Application |
|
Some of these permissions require administrative consent - this needs to be granted.

Configure the client secret using the option “Certificates & secrets” and clicking the button “upload certificate”.

Hint: The export of the certificate in format PKCS #12 with powershell with the following command (Password and Cert Path needs to be adopted) as password protected certificate archive.
C:\>Get-ChildItem -Path cert:\localMachine\my\5F98EBBFE735CDDAE00E33E0FD69050EF9220254 | Export-PfxCertificate -FilePath C:\mypfx.pfx -Password $mypwdHow to issue a self signed certificate for testing purpose is described in the following article. The relevant powershell examples are shown below.
App-only authentication | Microsoft Docs
# Create certificate $mycert = New-SelfSignedCertificate -DnsName "contoso.org" -CertStoreLocation "cert:\CurrentUser\My" -NotAfter (Get-Date).AddYears(1) -KeySpec KeyExchange # Export certificate to .pfx file $mycert | Export-PfxCertificate -FilePath mycert.pfx -Password $(ConvertTo-SecureString -String "P@ssw0Rd1234" -AsPlainText -Force) # Export certificate to .cer file

$mycert | Export-Certificate -FilePath mycert.cerAfter creating the Enterprise Application, the app needs to be assigned to the exchange adminstration role.


Setting up the target system connector
To connect to Microsoft 365 Exchange Online connect to the IAM.cloud portal with a user having the IAM.cloud application role “Global Target system configurator”. Click “Responsibilities” and “Target systems”.

In the list of available target system connectors select the connector “Microsoft Office 365 Exchange Online“ and click the button “Setup” to create a new target system instance.
Name the target system instance, put in a description. The IAM.cloud Gateway as the execution server is pre selected.

Attribute | Description |
|---|---|
Target system instance | The name of the target system instance - this is a freetext value with no technical relevance and will be used as the display name for the target system instance only. |
Description | The description to the target system instance - this is a freetext value with no technical relevance and will be used for documentation purposes only. |
Execution server | The server that will be executing the target system connectivity tasks. This has to be a specific IAM.cloud cloud Gateway in order to connect to Exchange Online. The relevant one is pre selected. |
After entering the target system instance attributes, click “Save” to enable the technical configuration of the target system connector.
Fill in the technical attributes for the target system connector and click “Save”.

Attribute | Description |
|---|---|
ShellDisplay | The value in the attribute ShellDisplay will be used as the name of the technical connectivity setup. |
ShellDescription | The value in the attribute ShellDescription will be used for documentation purposes for the technical connectivity setup. |
ConnectAppID | Client-ID / Application ID of the created enterprise application |
ConnectPFX | A PFX file of the Certificate assigned to Application, also known as PKCS #12. It is a single, password protected certificate archive that contains the entire certificate chain plus the matching private key. Essentially it is everything that any server will need to import a certificate and private key from a single file. |
ConnectPFXPassword | Password for the single password protected certificate archive |
TenantDisplay | Azure Active Directory org domain name |
TenantID | The ID of the Azure tenant |
OrganizationDisplayName | Azure Active Directory org domain name |

If all mandatory attribute values are filled in and the configuration is saved, the button “Rollout” will be enabled. Click “Rollout” to connect Microsoft 365 Exchange Online to IAM.cloud.
Related articles
-
Page:
-
Page:
-
Page:
-
Page:
-
Page: